.png)
You want a smoother and clearer display. You can achieve this if you know how to change refresh rate on your monitor. This guide uses simple steps and clear language. You do not need technical skills. If you follow each step, you will see results quickly. If you face any problems, you will also find solutions here.
Key Takeaways
- You can change your monitor’s refresh rate on Windows, macOS, or Linux. You can also do it from your monitor’s menu. Just follow some easy steps.
- Always check your current refresh rate first. Make sure your monitor, graphics card, and cables can use the higher refresh rate you want.
- Use the right cables like DisplayPort 1.4 or HDMI 2.0. Keep your drivers and firmware updated. This helps you avoid display problems.
- Higher refresh rates make your screen look smoother. They help lower eye strain. They also make games better with less blur and lag.
- If you have problems like missing refresh rate choices or screen flickering, try updating your drivers. You can also lower the refresh rate or use your monitor’s menu.
Change Refresh Rate: Quick Steps
Changing your monitor’s refresh rate can make your screen look smoother. You can follow these quick steps for your operating system or monitor menu.
Windows
- Right-click on your desktop and choose Display Settings.
- Scroll down and select Advanced Display Settings.
- If you use more than one monitor, pick the correct screen from the dropdown.
- Click on Display Adapter Properties for your chosen monitor.
- Go to the Monitor tab.
- Select your preferred refresh rate from the list.
- Click Apply, then OK to save your changes.
Tip: Always check which monitor you want to adjust if you have more than one connected. Most users only use one monitor, but it is good to double-check.
macOS
- Open the Apple menu and go to System Settings or System Preferences.
- Click Displays.
- Hold the Option key and click Scaled to see more refresh rate choices.
- Pick the refresh rate you want. The system will change it right away.
Linux
- Press the Windows key and search for Display.
- Open Display settings.
- Find the Refresh Rate dropdown.
- Choose the refresh rate you want.
- Click Apply to confirm.
Note: Some Linux desktops like XFCE or Mate use different settings managers. You can open them by running
xfce4-settings-managerormate-control-center.
Monitor OSD
- Press the Menu button on your monitor to open the On-Screen Display (OSD).
- Use the arrow buttons to find the refresh rate or display settings.
- Select your desired refresh rate.
- Confirm and exit the menu.
You can change refresh rate easily on any system by following these steps. Always remember to confirm your changes so your monitor uses the new setting.
Check Compatibility
Current Refresh Rate
Before you try to adjust your monitor, you need to know your current refresh rate. Each operating system has a simple way to check this information.
Windows
- Press Windows + I to open Settings.
- Go to System > Display > Advanced Display Settings.
- Look for the Refresh Rate section under Display Information. You will see the current value in Hz.
macOS
- Click the Apple menu and open System Preferences or System Settings.
- Select Displays.
- Under the Display tab, you can view the current refresh rate in Hz.
Linux
- Open Display settings from the system menu or search for Display.
- Find the Refresh Rate section to see the current value.
- Alternatively, open a terminal and type
xrandr -q. The refresh rate appears next to your screen resolution.
Tip: Always check your current refresh rate before making changes. This helps you avoid setting a value your monitor cannot handle.
Monitor and Cable Support
Not every monitor or cable can support high refresh rates like 120Hz or 144Hz. You need to make sure your hardware matches your needs.
- Your monitor must list the higher refresh rates in its specifications.
- Your graphics card should support the refresh rate you want. You can check this in your system’s display settings or with GPU software.
- Use the right cable. For 120Hz or 144Hz, you need DisplayPort 1.4 or HDMI 2.0 (or higher). Older cables may limit your refresh rate.
- Make sure your drivers and firmware are up to date. Outdated software can cause problems.
- Check that all cable connections are secure. Loose or faulty cables can lead to display issues.
| Component | Minimum Requirement for 120Hz+ |
|---|---|
| Monitor | 120Hz or 144Hz support |
| Graphics Card | 120Hz or 144Hz output |
| Cable | DP 1.4 or HDMI 2.0+ |
Note: Overclocking your monitor beyond its rated refresh rate can cause instability or damage. Always use supported values.
If you follow these steps, you can avoid most compatibility problems when you change refresh rate.
By Operating System
Windows 10/11
You can change refresh rate on Windows 10 and Windows 11 using the built-in settings. The process is simple and works for most monitors.
- Click the Start button and open Settings.
- Go to System, then select Display.
- Scroll down and click Advanced display settings.
- If you have more than one monitor, select the display you want to adjust from the dropdown menu under “Choose Display.”
- Under the “Refresh rate” section, pick your preferred refresh rate from the available options.
- Click Apply to confirm your choice.
Windows 11 introduces Dynamic Refresh Rate (DRR). This feature lets your system automatically adjust the refresh rate based on your activity. You can enable or disable DRR in Advanced display settings if your hardware supports it. Windows 10 does not support DRR, so you must select a fixed refresh rate.
Tip: If you use multiple monitors, always check which screen you are adjusting. Windows may default to the primary monitor.
macOS
You can change refresh rate on macOS, but you may notice some limitations, especially with external monitors.
- Open the Apple menu and select System Preferences or System Settings.
- Click Displays.
- Hold the Option key and click the Scaled radio button to reveal more refresh rate options.
- Choose the refresh rate you want from the list (such as 60 Hz, 47.95 Hz, 48 Hz, 50 Hz, or 59.94 Hz).
- Apply the changes and check your display for smoothness.
- For external monitors, repeat these steps for each display.
If you use a MacBook Pro with a Liquid Retina XDR display, you can select ProMotion (adaptive up to 120Hz) or fixed rates. For external monitors, macOS sometimes limits refresh rates, especially over HDMI. You may only see 30Hz at 4K resolution, which can cause mouse lag or choppy motion. Lowering the resolution below 1080p or using a USB-C to DisplayPort cable can unlock higher refresh rates like 60Hz. Some macOS updates have removed high refresh rate options, so always check for the latest system updates.
Note: macOS does not support MST (Multi-Stream Transport), so managing refresh rates for multiple monitors can be difficult. Windows and Linux offer more flexibility for these setups.
Linux (Ubuntu, Others)
Linux gives you several ways to change refresh rate, but the process depends on your desktop environment.
Using Display Settings (GUI)
- Open your system menu and search for Display.
- In the Display settings window, find the Refresh Rate dropdown.
- Select your desired refresh rate.
- Click Apply to save the changes.
Using Terminal (xrandr)
You can use the xrandr command for more control or if your desktop environment does not offer a refresh rate option.
xrandr -s 1920x1080 -r 75
This command sets your display to 1920×1080 resolution at 75Hz. To make this change permanent, add the command to your Startup Applications or edit the ~/.config/monitors.xml file and set the <rate> tag.
For NVIDIA Users
If you use an NVIDIA GPU, you can open Nvidia X Server Settings to adjust the refresh rate. For custom rates, you may need to modify the EDID file and update your xorg.conf file. This process is more advanced and helps when standard tools do not show the refresh rate you want.
Note: Some desktop environments, like Cinnamon, may not keep your chosen refresh rate and can revert to 60Hz during normal use. KDE Plasma on Wayland may switch refresh rates after login. The process can vary, so check your environment’s documentation if you run into issues.
NVIDIA Control Panel
If you have an NVIDIA graphics card, you can use the NVIDIA Control Panel to change refresh rate and fine-tune your display settings.
- Open the NVIDIA Control Panel.
- Go to the Display section.
- Click on Change Resolution.
- Select your monitor from the list.
- Under the “PC” category, choose your preferred resolution.
- Use the refresh rate dropdown to pick the rate you want.
- Click Apply to confirm.
The NVIDIA Control Panel gives you more control, especially for gaming monitors that support high refresh rates like 144Hz. If you use multiple monitors, you may face some challenges. The Control Panel and drivers often require all monitors to run at the same refresh rate and pixel clock for synchronization. If you connect monitors with different refresh rates, the system may default to the lower rate or not synchronize them properly. Professional hardware, such as Quadro Sync cards, is needed for perfect synchronization across different monitors. G-SYNC works for variable refresh rates on single displays but does not sync multiple monitors.
Tip: If you notice your main monitor drops to a lower refresh rate when you connect a second monitor, try resetting the refresh rate in Display Settings. If the issue continues, check your cables and hardware compatibility.
Troubleshooting
Option Not Available
Sometimes, you cannot find the refresh rate you want in settings. This can happen for a few reasons:
- Open Settings, then System, then Display, then Advanced Display Settings, and then Display Adapter Properties.
- Click the Monitor tab to see which refresh rates are listed.
- If your monitor’s best refresh rate is not there, try more steps.
Driver problems can cause this issue. Even if you reinstall your graphics drivers, some refresh rates might still be missing. Some monitors have an “Overclocking” option that changes which refresh rates you can use. You might need special software from your monitor brand, like DisplayWidgetLite, to change refresh rates. On macOS, updates like Sonoma can make refresh rate choices disappear, even if your hardware is fine. This usually means the problem is with software or drivers, not your cables or monitor.
If you still do not see the option, try these ideas:
- Update your BIOS and all drivers with your PC maker’s tool.
- Reset BIOS settings to default.
- Set your power plan to balanced.
- Do a full shutdown, not just sleep.
- Only update drivers from official sources.
Flicker or Display Issues
After changing refresh rate, you might see flickering, black screens, or freezing. Many people say that going above 60Hz can make the screen go black. Sometimes, the display flashes on for a second, then turns black again. Lowering the refresh rate often fixes this. These problems happen when your monitor cannot handle the resolution and refresh rate you picked. If your screen freezes during games or heavy use, your second monitor might freeze too, but sound and apps keep working. This means your system cannot keep up with the new settings.
If you see these problems, try lowering the refresh rate or resolution. You can also check your monitor’s manual for what works best.
Driver and Cable Fixes
Drivers and cables are important for refresh rate problems. Sometimes, using an older graphics driver can fix things. For example, one person fixed their issue by using an older AMD driver. If your system uses the Microsoft Basic display driver, install the real driver for your graphics card. Adding your monitor’s INF file can help Windows see all the refresh rates your monitor supports.
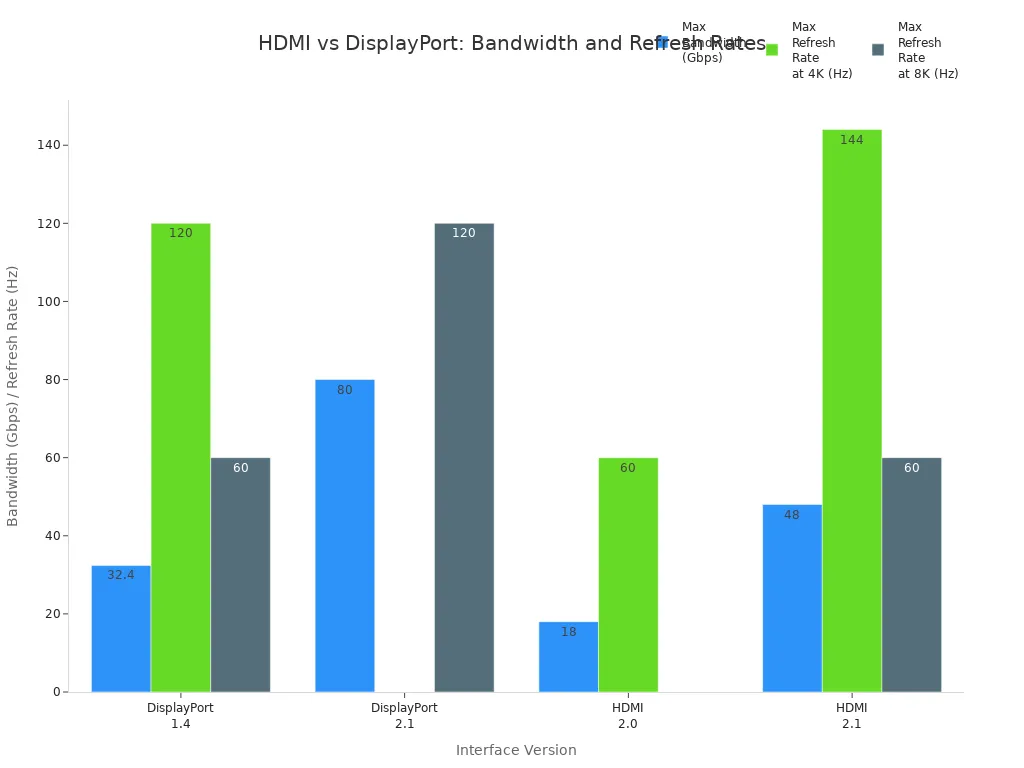
Cables matter a lot, too. HDMI 2.0 and DisplayPort 1.4 or higher can handle higher refresh rates. If you use an old HDMI cable, you may not get more than 60Hz. Many people find that switching from HDMI to DisplayPort lets them use 144Hz at 1080p. The table below shows what each cable type can do:
| Interface Version | Max Bandwidth (Gbps) | Max Resolution and Refresh Rate |
|---|---|---|
| DisplayPort 1.4 | 32.4 | 8K @ 60Hz (uncompressed), 4K @ 120Hz |
| DisplayPort 2.1 | 80 | 10K @ 60Hz, 8K @ 120Hz (uncompressed) |
| HDMI 2.0 | 18 | 4K @ 60Hz |
| HDMI 2.1 | 48 | 8K @ 60Hz (compressed), 4K @ 144Hz |
If you cannot change refresh rate in system settings, use your monitor’s OSD menu. Press the menu button on your monitor and look for refresh rate options there.
Tips and Best Practices
Gaming and Everyday Use
The refresh rate you pick depends on what you do. For normal things like web browsing or watching videos, 60Hz is enough. Text looks clear and videos play smoothly. If you want smoother scrolling or edit videos, try 100Hz or higher. This makes moving windows and scrolling look better. You will see less blur and smoother motion.
Gamers often want higher refresh rates. Fast games like shooters or racing games work best at 144Hz or more. This gives less lag and smoother action, so you can react faster. Pro gamers sometimes use 240Hz or even 360Hz monitors. These give the clearest motion and lowest lag. You need a strong computer to use these high speeds.
| User Type / Use Case | Recommended Refresh Rate(s) | Reason / Benefit |
|---|---|---|
| Everyday Use (Office, Browsing) | 60Hz | Good for web, office, and video. |
| Everyday Use (Enhanced) | 100Hz or higher | Smoother scrolling and better for editing or multitasking. |
| Casual Gamers | 60Hz to 120Hz | Fine for less demanding games. |
| Most Gamers | 144Hz to 200Hz | Smoother gameplay and better response. |
| Competitive / Elite Gamers | 240Hz to 360Hz+ | Best for fast action and lowest input lag. |
Variable Refresh Rate (VRR) features like G-Sync and FreeSync help your monitor match your graphics card. This stops screen tearing and stuttering, so games look smoother.

Risks and Benefits
Higher refresh rates have many good points. You get smoother motion, less flicker, and clearer images. This can help your eyes feel better if you use your computer a lot. Studies show that going from 60Hz to 120Hz helps most with comfort and motion clarity. You also get better tracking and less blur, which helps in games and daily use.
- Higher refresh rates (75Hz, 100Hz, and above) make things look smoother and cut down flicker.
- Less flicker means your eyes get less tired during long use.
- Motion blur drops as refresh rates go up, so fast moves look sharper.
- Moving from 60Hz to 100Hz makes scrolling and changes look much smoother.
- Flicker-free screens are better for your eyes if you use your monitor for hours.
There are some risks, too. Using a refresh rate your monitor does not support can cause problems. Old CRT monitors could break if set too high. New LCD monitors usually just show an error or go black if you pick a bad rate. Always check your monitor’s manual or specs before you change refresh rate. Most new monitors and computers stop you from making a bad choice, but it is still smart to use only safe settings.
You can change refresh rate on your monitor by following simple steps for Windows, macOS, Linux, or your monitor’s menu. Always check that your cables and ports match your monitor’s needs. Not all cables work the same—long or low-quality cables can lower signal quality, especially at high refresh rates. If you have trouble, try these steps:
- Update your drivers and firmware.
- Use the correct cable and port.
- Test your monitor alone without other screens.
A smooth display starts with the right setup. Try these tips and enjoy a better viewing experience!
FAQ
How do I know if my monitor supports higher refresh rates?
Check your monitor’s manual or look up the model online. You can also open your system’s display settings. If you see options above 60Hz, your monitor supports higher refresh rates.
Why does my screen go black after changing the refresh rate?
Your monitor may not support the selected refresh rate. Try lowering the refresh rate in your display settings. If the screen stays black, restart your computer. Use safe settings to avoid this issue.
Can I use any cable for high refresh rates?
No. You need the right cable for high refresh rates. For example, HDMI 2.0 or DisplayPort 1.4 support 120Hz or more. Older cables may limit your refresh rate.
Tip: Always check your cable type before changing refresh rates.
Will a higher refresh rate improve my gaming experience?
Yes. A higher refresh rate makes games look smoother and feel more responsive. Fast action games benefit the most. You will notice less motion blur and quicker reactions.